
When my grandmother first taught me how to clean a clogged dryer vent, I admit I was skeptical. I had grown up believing that home maintenance required expensive tools, specialized services, or professional technicians.
But Grandma insisted that none of that was necessary — just a few basic tools, a little elbow grease, and careful attention.
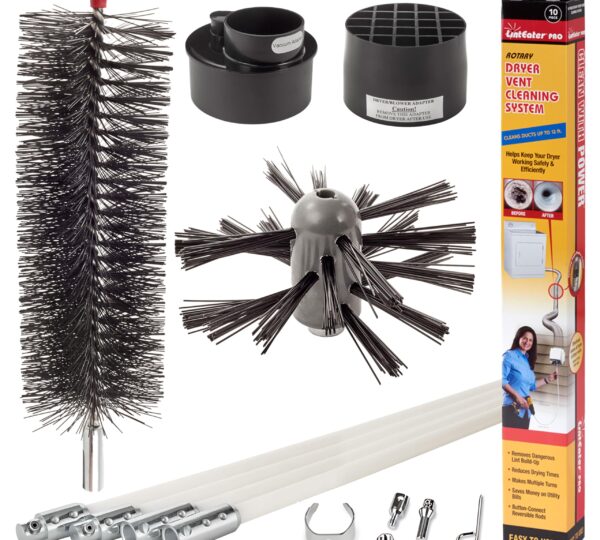
Her toolkit was modest: a vacuum cleaner, a long, flexible brush, and an old leaf blower she had kept in the garage for decades.
Looking at me with a calm, confident smile, she said, “This keeps your dryer running right, keeps your house safe, and costs next to nothing.” At the time, I thought she was exaggerating. I soon realized she wasn’t.
What many people don’t understand is that a clogged dryer vent is not merely an inconvenience — it is a serious fire hazard.
According to the U.S. Fire Administration, clothes dryers cause nearly 2,900 house fires each year, and failure to clean the vent is the leading contributing factor.
These fires can start silently, smolder unnoticed behind the walls or in attics, fueled by the highly flammable combination of lint and heat.
Beyond the risk of fire, lint buildup significantly reduces a dryer’s efficiency, increases energy bills, and shortens the lifespan of the appliance itself. It can also create a subtle but persistent burning smell that often goes unnoticed until it’s too late.
Grandma had experienced a small fire decades earlier, and she never wanted another family member to face that danger.
When Grandma said that cleaning the dryer vent was a “must-do,” I listened carefully. Over the years, I’ve come to appreciate just how simple, safe, and effective her method is — and how much time and money it can save, not to mention the peace of mind it provides.
Here’s the method she taught me, step by step, with all the details you need to do it safely and effectively.
Step 1: Safety First
The first lesson Grandma emphasized was always safety. Before touching the dryer vent, unplug the dryer from its electrical outlet. If your dryer is gas-powered, make sure to shut off the gas valve.
This precaution prevents any accidental sparks or gas leaks during the cleaning process. Then, carefully pull the dryer away from the wall — not too far, just enough to access the vent in the back.
While some homeowners may overlook this step, it is critical. Even a small gap allows you to work more efficiently and avoid damaging the vent or the dryer itself.
Step 2: Vacuum the Opening
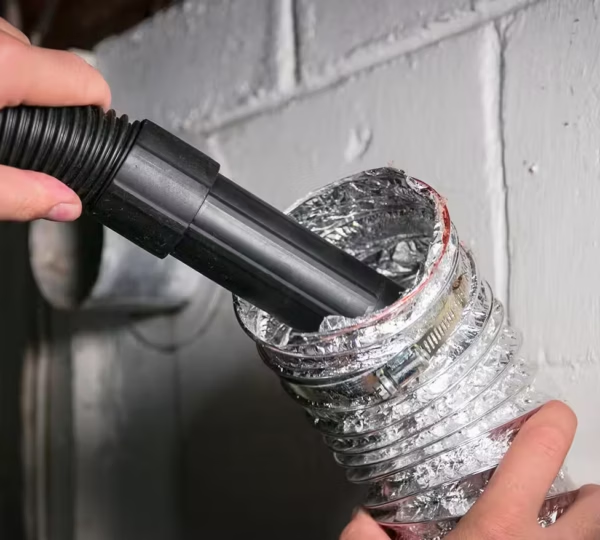
Next, take a vacuum cleaner equipped with a hose attachment and remove all visible lint and dust from the back vent and the surrounding floor area.
You would be surprised how much lint can accumulate in the small gap between the dryer and the wall, even if you regularly clean the lint trap.
Grandma told me stories of her neighbors who ignored this step, only to have lint ignite and start a fire behind the dryer.
Using the vacuum first prevents dust from spreading into the room and gives you a clear view for the next steps. It also helps loosen any larger clumps that have settled in the initial section of the duct.
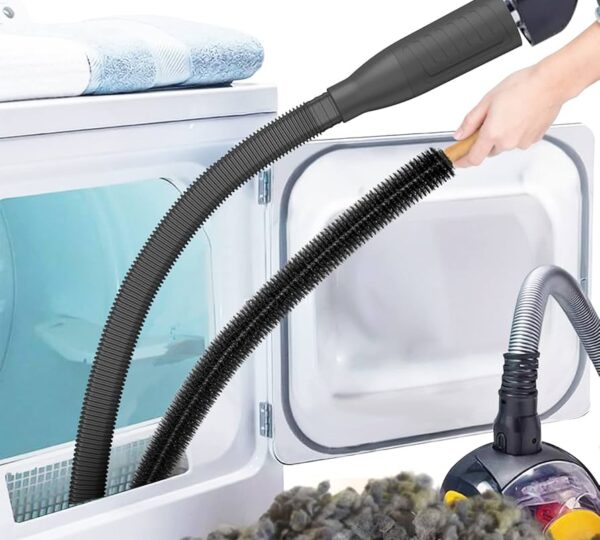
Step 3: Use a Flexible Vent Brush
Now comes the part that makes all the difference: the flexible dryer vent brush. These brushes are long, sometimes extending up to six feet, and designed to twist and bend through your vent ducts.
Grandma always emphasized patience here. Feed the brush into the vent, gently twisting and pushing to loosen the lint and dust clinging to the interior walls.
The key is to move slowly, ensuring you don’t tear the duct or create holes. Many people make the mistake of forcing the brush too quickly, which can damage the vent or push debris further inside.
A proper brushing technique can dislodge years of built-up lint and restore airflow to near-original efficiency.
Step 4: Vacuum Again
After brushing, go back with the vacuum and carefully suck up all the debris that has been loosened. Grandma taught me that the combination of mechanical agitation and suction is far more effective than either method alone.
This step also ensures that no large clumps of lint remain near the vent opening, reducing the risk that they will be pushed back into the duct when the dryer is reconnected.
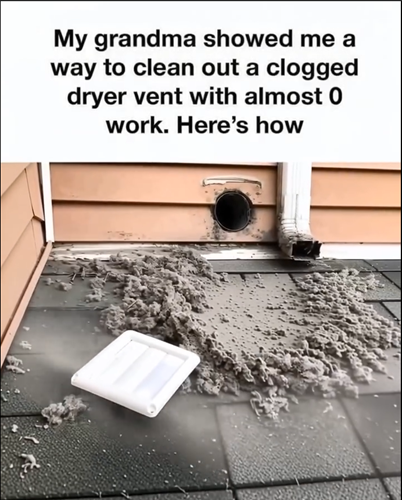
Step 5: Blow It Out from the Outside
Here’s where Grandma’s approach becomes truly clever. Head outside to the location where the dryer vent exhausts your home. Usually, the vent cover is held in place with a few screws.
Remove it carefully, keeping an eye on any small birds or insects that may have nested inside — another common hazard. Then, take a leaf blower, a tool Grandma kept just for this purpose, and insert the nozzle into the vent. Give it a few strong bursts.
The effect is immediate: dust, lint, and small debris shoot out into the open air. It’s oddly satisfying to see all the accumulated material finally expelled.
Beyond satisfaction, this step ensures that airflow is restored throughout the entire vent, not just near the dryer. It’s a technique that combines the simplicity of household tools with a surprisingly effective result.
Step 6: Reassemble and Test
Once the vent is cleared, put the vent cover back on, reconnect your dryer, and slide it back into place. Then run a short cycle with a small load to test it.
Grandma always told me to feel the exterior of the dryer during this first cycle. If the machine feels cooler, runs quieter, and the clothes dry more evenly, you’ve done it correctly.
You’ll often notice that even residual odors from lint and dust disappear after this treatment. It’s a small but noticeable improvement, and one that reassures you that your dryer is now operating safely and efficiently.
Why This Works So Well
Grandma’s method works because it addresses the problem from multiple angles: suction, mechanical loosening, and airflow restoration.
Many people focus only on cleaning the lint trap or superficially vacuuming near the back of the dryer, leaving hundreds of feet of venting ducts filled with dangerous, flammable material.
By combining brushing with vacuuming and then forcefully expelling debris from the exhaust, Grandma’s method maximizes safety while minimizing time and expense.
The benefits extend beyond safety. Lint buildup decreases the efficiency of your dryer, increasing the energy it consumes and extending drying times.
By keeping the vent clean, you reduce electricity bills, save time, and extend the life of the appliance. From a practical perspective, the investment is minimal: a vent brush costs less than $20, and a leaf blower is a common household tool that can also be used for yards or garages.
Compared with the hundreds of dollars a service technician might charge, it’s a straightforward and cost-effective solution.
The Emotional Impact of a Simple Task
For me, learning this method from Grandma was more than just a lesson in home maintenance — it was an exercise in mindfulness and care.
She moved deliberately, spoke softly, and demonstrated how small, routine actions could prevent large-scale disasters. Every spring and every fall, she would insist we perform this ritual together, ensuring that the dryer was not only clean but that we were actively protecting our home and family.
There was a rhythm to the process, a sense of stewardship that extended beyond the machine itself.
After performing the method with her for the first time, I was amazed at how much of a difference it made. The dryer worked like new: clothes dried faster, more evenly, and with less energy consumption.
The subtle burning smell that had lingered for years was gone. Most importantly, I felt a sense of security knowing that the fire risk in that part of the house was greatly reduced.
It was a simple act with profound consequences — the kind of wisdom that only comes from decades of experience.
A Lesson in Household Safety
Over the years, I’ve come to appreciate that small household maintenance tasks are often overlooked until they become emergencies.
A clogged dryer vent may seem trivial until it sparks a fire, increases your bills, or shortens the life of your dryer. Grandma’s method is a reminder that consistent, careful attention to routine tasks can prevent accidents and save money.
This method has now become a family tradition. Every spring and fall, I clean my dryer vents using Grandma’s exact steps.
I even pass the knowledge along to friends and neighbors, sharing the simple yet powerful combination of vacuuming, brushing, and using airflow to prevent dangerous buildup.
In many ways, it’s a legacy — a lesson passed from generation to generation, ensuring safety, efficiency, and peace of mind.
Final Thoughts
A clogged dryer vent is a silent hazard, often unnoticed until it becomes a serious problem. By learning and following Grandma’s method, anyone can reduce the risk of house fires, improve dryer efficiency, and save money in the long term.
Her approach is a testament to practicality, resourcefulness, and the power of hands-on knowledge passed down through generations.
For anyone who has never cleaned their dryer vent thoroughly, I cannot stress enough how important it is. Start with safety, use the proper tools, be patient, and never underestimate the value of proper airflow.
Beyond the technical aspects, the process offers a quiet sense of accomplishment and reassurance that your home is safer and your appliances are working at their best.
Grandma’s words still echo in my mind every time I perform this ritual: “This keeps your dryer running right, keeps your house safe, and costs next to nothing.” It’s simple, it’s effective, and it works.
In an age where professional services and expensive gadgets are often overemphasized, this old-fashioned, hands-on approach remains invaluable.
Whether you are a new homeowner, a parent passing on household knowledge to children, or someone looking to maintain your home efficiently and safely,
Grandma’s method for cleaning a clogged dryer vent is a small investment of time and effort with enormous potential payoff.
It is one of those rare pieces of advice that is both practical and protective — a small act that can prevent disaster and improve everyday life in ways that are immediate and tangible.